Create/Instantiate Objects 对象的实例化 创建一个类始终需要在C++中占用内存,即使是空类,也会占用一个字节
1
2
3
4
5
6
7
8
9
10
11
12
13
14
15
16
17
18
19
20
21
22
23
24
25
26
27
28
29
30
31
32
33
34
35
36
37
38
39
40
41
42
using String std::string;class Entity { private : String m_Name; public : Entity () : m_Name ("Unknown" ) {} Entity (const String& name) : m_Name (name) {} const String& GetName () const return m_Name; } }; void Function () Entity entity = Entity ("Cherno" ); } int main () Funtion (); Entity entity; Entity entity2 = Entity ("Cherno" ); Entity entity3 ("Cherno" ) ; std::cout << entity.GetName () << std::endl; Entity* e; { Entity entity ("Cherno" ) ; e = &entity; std::cout << entity.GetName () << std::endl; } Entity* e; { Entity* entity = new Entity ("Cherno" ); e = entity; std::cout << (*entity).GetName () << std::endl; std::cout << entity->GetName () << std::endl; } delete e; }
New Keyword New关键字 New的主要功能是在heap堆上分配内存
new int在内存上连续的一部分分配一个4bytes的空间,并返回一个指针指向这个地址
1
2
3
4
5
6
7
8
9
int a = 2 ;int * b = new int ;int * b = new int [50 ];Entity* e = new Entity (); Entity* e = new Entity[50 ]; (Entity*)malloc (sizeof (Entity));
new的实质是一个operator
Implicit Conversion and the Explicit Keyword隐式转换和显式关键字 1 2 3 4 5 6 7 8 9 10 11 12 13 14 15 16 17 18 19 20 21 22 23 24 class Entity {private : std::string m_Name; int m_Age; public : Entity (const std::string& name):m_Name (name),m_Age (-1 ){} Entity (int age) : m_Name ("Unknown" ),m_Age (age){} }; void PrintEntity (const Entity& entity) } int main () Entity a ("Cherno" ) ; Entity b (22 ) ; Entity a = "Cherno" ; Entity b = 22 ; PrintEntity (22 ); PrintEntity ("Cherno" ); PintEntity (std::string ("Cherno" )); }
显示关键字禁止隐式转换
1 2 3 4 5 6 7 8 9 10 11 class Entity {private : std::string m_Name; int m_Age; public : explicit Entity (const std::string& name) :m_Name(name),m_Age(-1 ){ Entity (int age) : m_Name ("Unknown" ),m_Age (age){} }; void PrintEntity (const Entity& entity) }
OPERATORS and OPERATOR OVERLOADING运算符和运算符重载 运算符就是一种函数
1 2 3 4 5 6 7 8 9 10 11 12 13 14 15 16 17 18 19 20 21 22 23 24 25 26 27 28 29 30 31 32 struct Vector2 { float x,y; Vector2 (float x,float y) :x (x),y (y){} Vector2 Add (const Vector2& other) const { return Vector2 (x+other.x,y+other.y); } Vector2 Multiply (const Vector2& other) const { return Vector2 (x*other.x,y*other.y); } Vector2 operator + (const Vector2& other) const { return Vector2 (x+other.x,y+other.y); } Vector2 operator * (const Vector2& other) const { return Vector2 (x*other.x,y*other.y); } }; std::ostream& operator <<(std::stream& stream,const Vector2& other){ stream<<otehr.x<<", " <<other.y; return stream; } int main () Vector2 pos (4.0f ,4.0f ) ; Vector2 dir (3.0f ,5.0f ) ; Vector2 speed (1.1f ,1.1f ) ; Vector2 resul=pos.Add (dir.multiply (speed)); Vector2 resul2 = pos+dir*speed; std::cout << result <<std::endl; }
“this”关键字 在类中,this是一个指向当前实例的指针
1 2 3 4 5 6 7 8 9 10 11 12 13 14 15 16 17 18 19 20 21 22 23 24 25 26 27 28 void PrintEntity (Entity* e) void PrintEntity (const Entity& e) class Entity {public : int x,y; Entity (int x,int y) { Entity* e = this ; x = x; y = y; e->x = x e->y = y this ->x = x; this ->y = y; PrintEntity (this ); Entity& e =*this PrintEntity (*this ); } int GetX () const const Entity* e = this ; const Entity& e = *this ; return x; } }
Object Lifetime(Stack/Scope Lifetimes) 一个Scope就是一个独立的stack栈,声明周期结束,栈和栈上所有的东西都被销毁。
new关键字使变量创建在heap堆上,栈销毁不会影响堆
1 2 3 4 5 6 7 8 9 10 11 12 13 14 15 16 class Entity {public : Entity () {} ~Entity () {} } int main { { Entity e; } { Entity* e = new Entity (); } }
1 2 3 4 5 6 7 8 9 int * CreateArray () int array[50 ]; return array; } int main () int * a = CreateArray (); }
1 2 3 4 5 6 7 8 9 10 11 12 13 14 15 16 17 class ScopedPtr {private : Entity* m_Ptr; public : ScopedPtr (Entity* ptr) : m_Ptr (ptr){} ~ScopedPtr (){ delete m_Ptr; } } int main () { ScopedPtr e = new Entity (); Entity* a = new Entity (); } }
Smart Pointers智能指针
std::unique_ptr
std::shared_ptr
std::weak_ptr
在讲述new和delete的过程中,我们为了在Scope结束时自动释放new分配的内存,在Scope内定义了一个类,储存new分配内存的指针,并在这个类中的析构函数使用delete释放,使得new分配的内存生命周期和Scope一致
而智能指针就是自动完成这一功能
智能指针就是包裹一个原生的(real raw)指针,使用new分配内存,并且基于使用智能指针的scope使用delete释放内存
std::unique_ptr unique指针就是最简单的智能指针,完成上述任务。
unique指针无法copy(因为是unique),如果copy这个指针,它们指向同一块内存地址。如果一个指针释放,那第二个指向同一个地址的指针也被释放了。
1 2 3 4 5 6 7 8 9 10 11 12 13 14 15 16 17 18 19 20 21 #include <memory> class Entity {public : Entity () {} ~Entity () {} void Print () } int main { { std::unique_ptr<Entity> entity (new Entity()) ; std::unique_ptr<Entity> entity = std::make_unique <Entity>(); entity->Print (); } }
问题在于,如果想要复制指针、或者把它传入到一个函数中等等,unique无法做到
1 std::unique_ptr<Entity> e0 = entity;
std::shared_ptr shared_ptr工作的方式是使用reference counting引用计数 ,引用计数可以跟踪指针使用了多少引用,只要引用数为0就释放
1 2 3 std::shared_ptr<Entity> sharedEntity = std::make_shared <Entity>();
shared_ptr在内存中会另外分配一块地址control block,用于储存引用计数,如果先创建new entity(),然后传递给shared_ptr构造函数,这样就是两块地址,也是exception safety的。
1 2 3 4 5 6 7 8 9 { std::shared_ptr<Entity> e0; { std::shared_ptr<Entity> sharedEntity = std::make_shared <Entity>(); std::weak_ptr<Entity> weakEntity = sharedEntity; e0 = sharedEntity; } }
std::weak_ptr weak_ptr在复制上和shared_ptr是相同的,但是它没有引用计数,也不会增加shared_ptr的引用计数
1 2 3 4 5 6 7 8 { std::weak_ptr<Entity> e0; { std::shared_ptr<Entity> sharedEntity = std::make_shared <Entity>(); e0 = sharedEntity; } }
Copying and Copying Constructors拷贝与拷贝构造函数 1 2 3 4 5 6 7 8 9 10 11 12 13 14 15 struct vec2 { float x,y } int main () int a = 2 ; int b = a; vec2* a = new vec2 (); vec2* b = a; b++; b->x = 2 ; }
这些过程都是copy,包括reference
1 2 3 4 5 6 7 8 9 10 11 12 13 14 15 16 17 18 19 20 21 22 23 24 25 26 27 28 29 30 31 32 33 34 35 36 37 class String {public :private : char * m_Buffer; unsigned int m_Size; public : String (const char * string) { m_Size = strlen (string); m_Buffer = new Char[m_Size+1 ]; memcpy (m_Buffer,string,m_Size+1 ); m_Buffer[m_Size] = 0 ; } ~String () { delete [] m_Buffer; } char & operator [](unsigned int index) { return m_Buffer[index]; } friend std::ostream& operator <<(std::ostream& stream, const String& string); } std::ostream& operator <<(std::ostream& stream, const String& string) { stream<<string.m_Buffer; return stream; } int main () String string = "Cherno" ; String second = string; second[2 ] = 'a' ; std::cout<<string<<std::endl; std::cout<<second<<std::endl; std::cin.get (); }
在对string直接拷贝然后输出后,尽管有正确的结果,但是运行结束后程序出错了。
在内存中我们有这两个string,它们进行的拷贝叫做shallow copy浅拷贝,它拷贝的是指针。
因此这两个string在内存中有相同的child pointer value子指针值(应该是指成员变量的指针)。
即string和second两个实例的m_Buffer地址是相同的。
那么这里问题就很好理解了。因为写了析构函数,在程序结束时删除m_Buffer,但是两个实例共用一个m_Buffer,自然在第二次删除的时候删除不了东西,就报错了。
==那么这里我的思考是,如果说两个实例本来就需要用同一个变量,那么可否用static关键字来解决这个报错(至于在这里对string这个类有没有意义就不管了)==
到这里应用上的问题已经很明显了,也就是说如果类中的成员是指针的话,不同的实例之间在拷贝的时候使用的是shallow copy,无法达到我们想要的deep copy深拷贝。
解决方案就是使用拷贝构造函数。
1 2 3 4 5 6 7 8 9 10 11 12 13 14 15 16 17 18 19 20 21 22 23 24 25 26 27 28 29 30 31 32 33 34 35 36 37 38 39 40 41 42 43 44 45 46 47 48 49 50 51 52 53 54 55 56 class String {public :private : char * m_Buffer; unsigned int m_Size; public : String (const char * string) { m_Size = strlen (string); m_Buffer = new Char[m_Size+1 ]; memcpy (m_Buffer,string,m_Size+1 ); m_Buffer[m_Size] = 0 ; } String (const String& other); String (const String& other) : m_Buffer (other.m_Buffer), m_Size (other.m_Size){ } String (const String& other) { memcpy (this , &other, sizeof (String)); } String (const String& other) = delete ; String (const String& other) : m_Size (other.m_Size) { m_Buffer = new CHar[m_Size+1 ]; memcpy (m_Buffer, other.m_Buffer, m_Size + 1 ); } ~String () { delete [] m_Buffer; } char & operator [](unsigned int index) { return m_Buffer[index]; } friend std::ostream& operator <<(std::ostream& stream, const String& string); } void PringString (String string) std::cout<<string <<std::endl; } void PringString (const String& string) std::cout<<string <<std::endl; } int main () String string = "Cherno" ; String second = string; second[2 ] = 'a' ; PringString (string); PringString (second); std::cin.get (); }
Arrow Operator箭头操作符 1 2 3 4 5 6 7 8 9 10 11 12 13 14 15 16 17 18 19 20 21 22 23 24 25 26 27 28 29 30 31 32 33 34 35 36 37 38 39 40 class Entity {public : int x; public : void Print () const } class ScopedPtr {private : Entity* m_Obj; public : ScopedPtr (Entity* e) : m_Obj (e) { } ~ScopedPtr () { delete m_Obj } Entity* GetObject () { return m_Obj } Entiyt* operator ->() { retrun m_Obj; } const Entity* operator ->() const { return m_Obj } } int main () { Entity e; e.Print (); Entity* ptr = &e; (*ptr).Print (); ptr->Print (); ScopePtr entity = new Entity (); entiyt.GetObject ()->Print (); entity->Print (); const ScopePtr entity = new Entity (); }
1 2 3 4 5 6 7 8 9 10 struct vec3 { float x,y,z; } int main () ((vec3*)0 )->x; ((vec3)nullptr )->; int offset = (int *)&((vec3)nullptr )->x; vec3 }
Dynamic Arrays动态数组 关于standard template,它就像一个容器,可以包含各种类型的数据。
std::vector其实本身和vector没啥关系。
1 2 3 4 5 6 7 8 9 10 11 12 13 14 15 16 17 18 19 20 21 22 23 24 25 26 27 #include <vector> struct Vertex { float x,y,z; } int main () Vertex* vertices = new Vertex[5 ]; std::vector<Vertex> vertices; vertices.push_back ({1 ,2 ,3 }); for (int i = 0 ; i< vertices.size ();i++) { std::cout<<vertices[i] <<std::endl; } for (Vertex v : vertices) { std::cout<< v <<std::endl; } for (Vertex& v : vertices) { std::cout<< v <<std::endl; } vertices.erase (vertices.begin () + 1 ); vertices.clear (); }
Optimizing the useage of std::vector std::vector 在每次push_back时可能会进行拷贝,然后重新分配一段内存,删除原来的内存。因此速度会变慢
1 2 3 4 5 6 7 8 9 10 11 12 13 14 15 16 17 18 19 20 21 22 23 24 25 26 27 28 29 30 31 32 33 34 35 #include <vector> struct Vertex { float x,y,z; Vertex (float x,float y,float z) : x (x), y (y), z (z) {} Vertex (const Vertex& vertex) :x (vertex.x),y (vertex,y),z (vertex.z) { std::cout<<"copied" <<std::endl; } } int main () vertices.push_back ({1 ,2 ,3 }); vertices.push_back ({4 ,5 ,6 }); vertices.push_back (Vertex (7 ,8 ,9 )); std::vector<Vertex> vertices; vertices.reserve (3 ); vertices.push_back ({1 ,2 ,3 }); vertices.push_back ({4 ,5 ,6 }); vertices.push_back (Vertex (7 ,8 ,9 )); std::vector<Vertex> vertices; vertices.reserve (3 ); vertices.emplace_back (1 ,2 ,3 ); vertices.emplace_back (4 ,5 ,6 ); vertices.emplace_back (7 ,8 ,9 ); }
Using Libraries(static linking)静态链接 选择库的环境(32bit,64bit)并不意味着开发的环境需要是这个,而是开发的对象,目标的运行环境。
我们下载预编译版本的glfw(32-bit windows binaries)
通常libraries会有两部分
static linking
dynamic linking
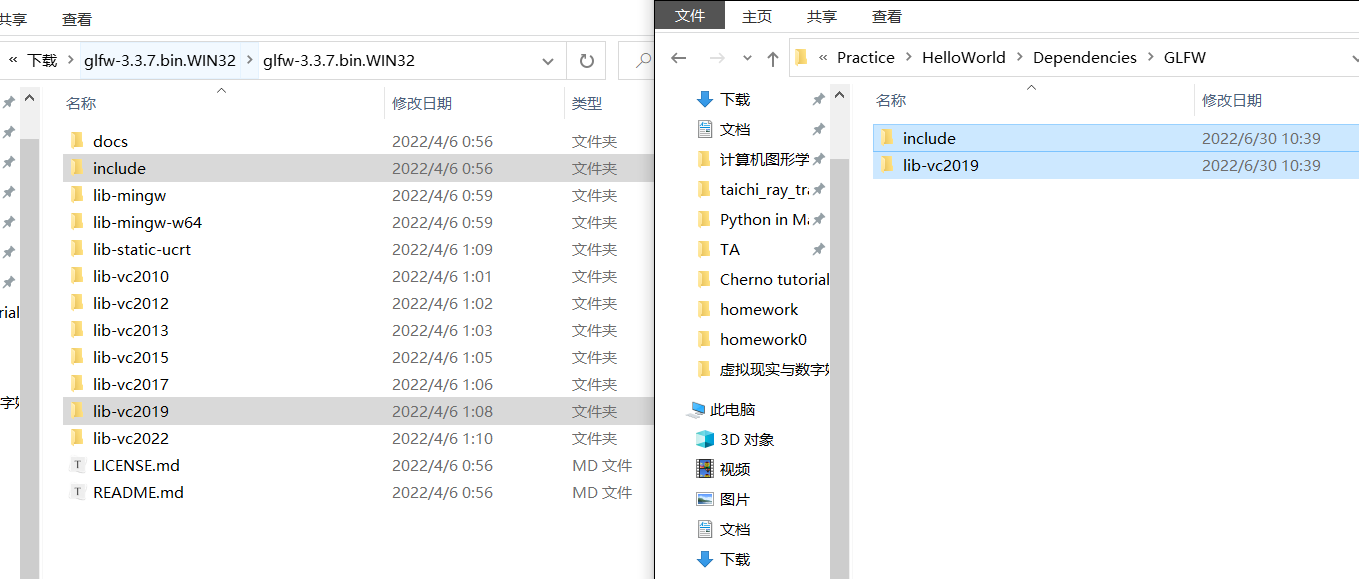
把需要的include和对应版本的lib文件放进项目依赖文件夹中
所以这就是预编译的意思,对于这个库已经帮你编译成lib文件了,运行的时候只需要link就行了,不用自己编译。
dll文件相当于一个字典储存了有哪些函数
lib就是一个static library静态库
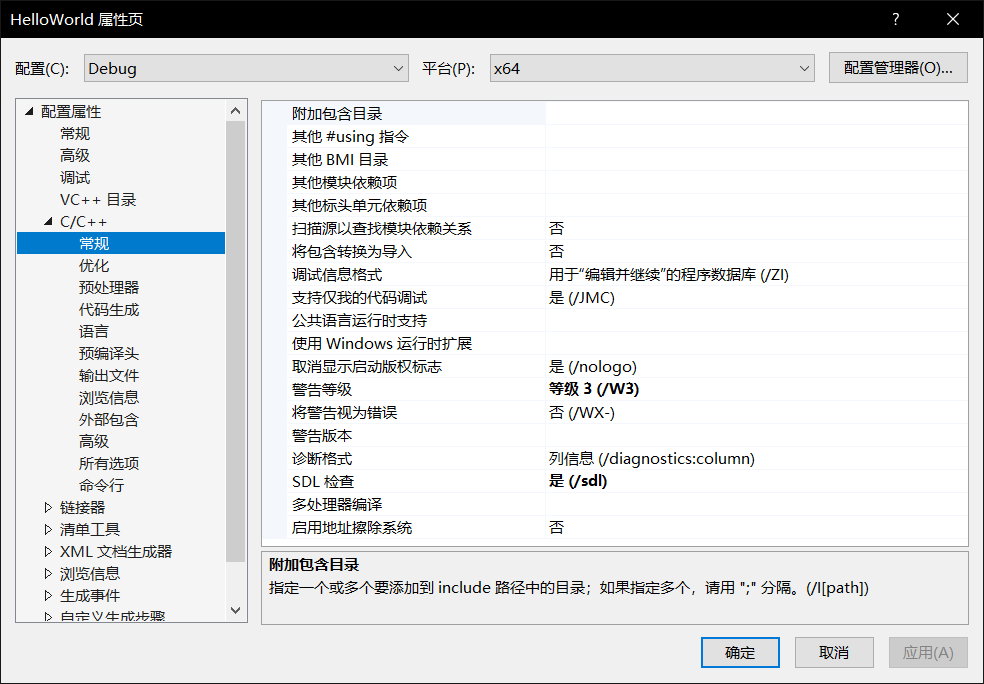
在C++ 常规属性的附加包含目录就是inlude的目录,可以使用解决方案的相对路径
D:\学习\浙大\C++\Cherno tutorial\Practice\HelloWorld\Dependencies\GLFW\include
$(SolutionDir)Dependencies\GLFW\include
然后就可以include了
使用引号会先检索目录地址,然后再查找外部依赖库
如果是外部依赖External Dependencies,建议使用<>
如果是和项目一起编译,再使用“”
这时已经可以正常编译了ctrl+7
但是运行时,在link阶段就出错了
这说明还没有对library进行link
因为我们include文件里,只有对这个函数的声明,但我们没有link去找到这个函数的定义。
1 2 3 4 5 6 7 8 9 10 11 12 #include <iostream> #include <GLFW//glfw3.h> int glfwInit () return 0 ; } int main () int a = glfwInit (); std::cin.get (); }
假如我这样搞,也是可以运行的。
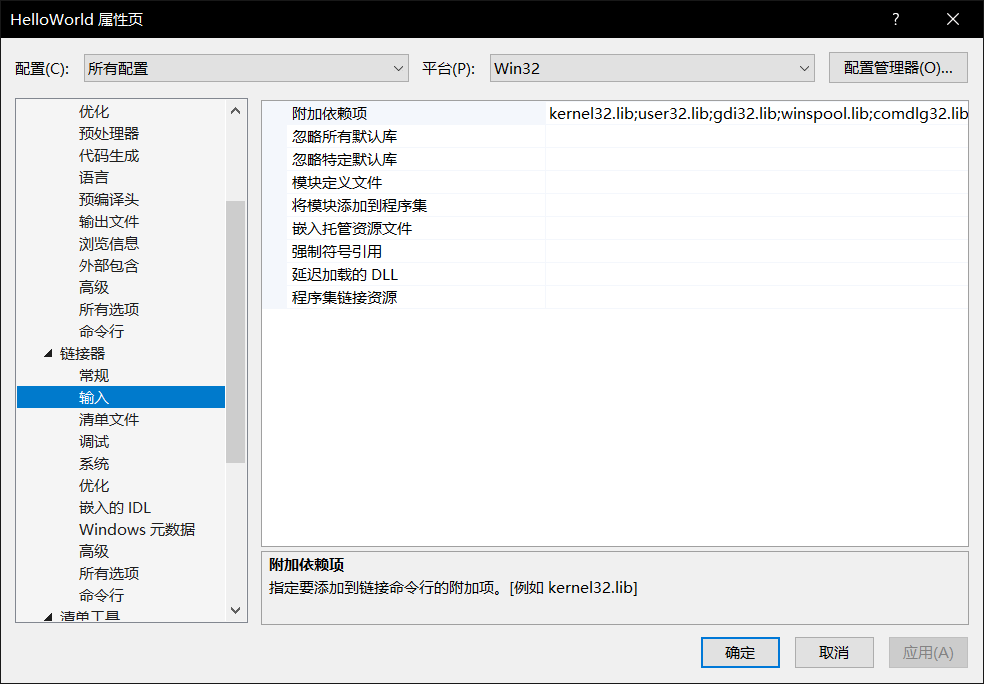
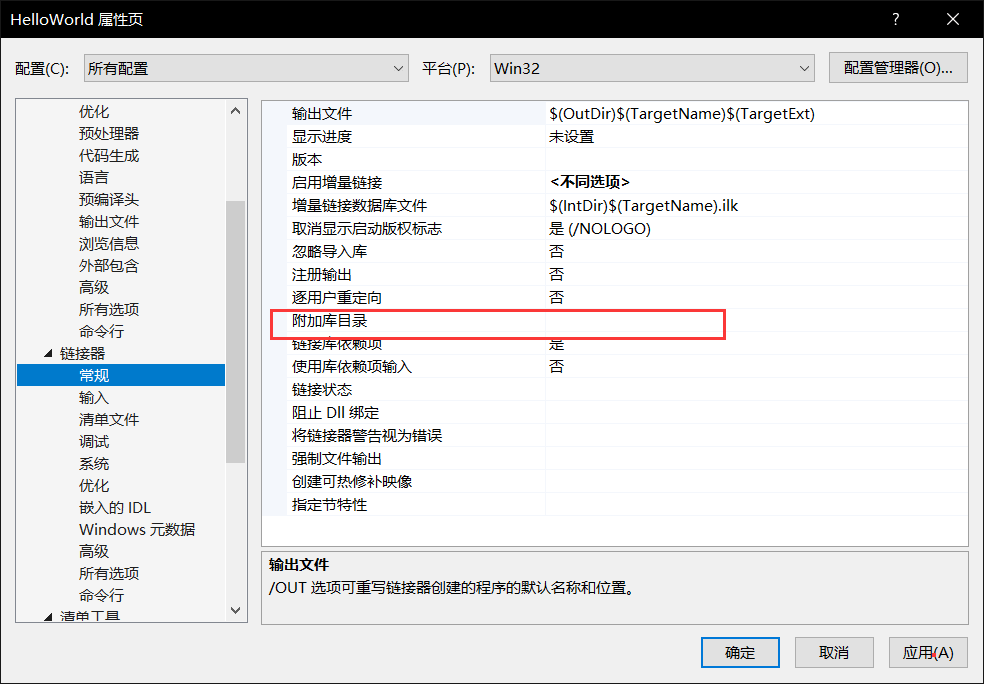
那么在项目属性的链接器linker中,可以添加附加依赖库
我可以输入lib的相对地址
也可以直接输入名字就行了,只需要在常规选项中添加一个附加库目录
Using Dynamic Libraries动态链接 ==这一段暂时有点看不懂在讲什么,贴个链接在这==,这个链接讲得很好
https://blog.csdn.net/alexhu2010q/article/details/106264237
上面的linking都是静态的,在编译时linking
dynamic linking就是在运行时linking,即启动程序的时候进行link,但它实际上不是exe的一部分。
当一般exe执行的时候,它加载进内存。如果有Dynamic link lib,这样会在运行时链接另外一个lib和额外的二进制文件(dll中),加载进内存。
C++的库文件分为两种:
lib文件
静态的
在build时就被打包到exe内
单独的一个exe文件就可以运行
dll文件
动态的
不会被打包到exe内
除了exe,还需要对应的dll文件一起才可以运行
glfw3dll.lib储存的是dll中的指针,用来记录glfw3.dll里面的函数等内容
他把link依赖库的glfwd.lib删掉了,然后换成了glfw3dll.lib
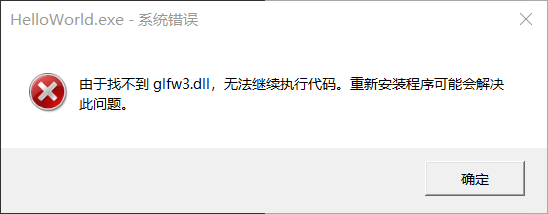
这时出现
只需要把dll文件和可执行文件放一起就可以了。exe在执行时就能自己去找到。所以这就是为什么那么多程序有好多dll文件,他们都采用了动态链接。
当然也可以自己设置地址,但是exe始终是自动搜索当前目录的。
当我们关注glfw库中的声明时,它们一律使用了一个GLFWAPI命名空间,从它的定义可以看到在这里使用静态和动态库的区别,静态库就直接define GLFWAPI了,动态库使用了一个__declspec(dllimport)命令,(第一部分是export导出成dll的)
1 2 3 4 5 6 7 8 9 10 11 12 13 14 15 16 #if defined(_WIN32) && defined(_GLFW_BUILD_DLL) #define GLFWAPI __declspec(dllexport) #elif defined(_WIN32) && defined(GLFW_DLL) #define GLFWAPI __declspec(dllimport) #elif defined(__GNUC__) && defined(_GLFW_BUILD_DLL) #define GLFWAPI __attribute__((visibility("default" ))) #else #define GLFWAPI #endif
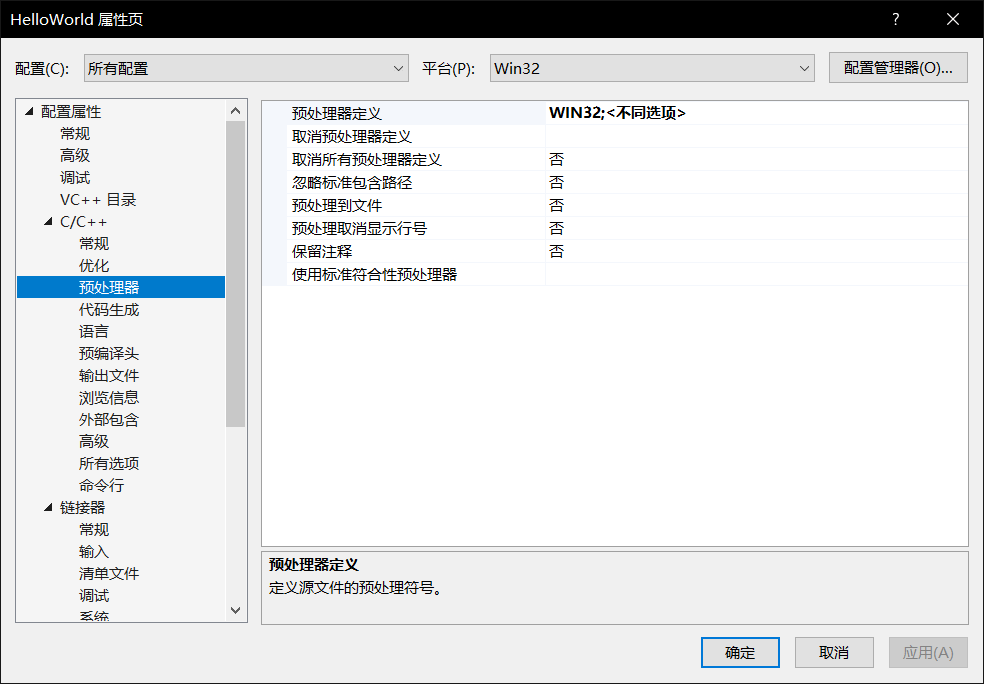
但是问题在于,我们明明没有在预处理器定义里些GLFW_DLL,GLFWAPI定义为nothing,我们仍然能成功运行,这是为什么,教程把它留作小作业希望我们自己处理
在预处理器这里加上GFLW_DLL,和不加并没有任何不同
可以看到不加这个定义,它是作为静态库的
目前的理解暂时是,由于glfw3dll.lib的存在,它储存了dll中的指针,因为是静态链接,在编译的时候自己就找到了。
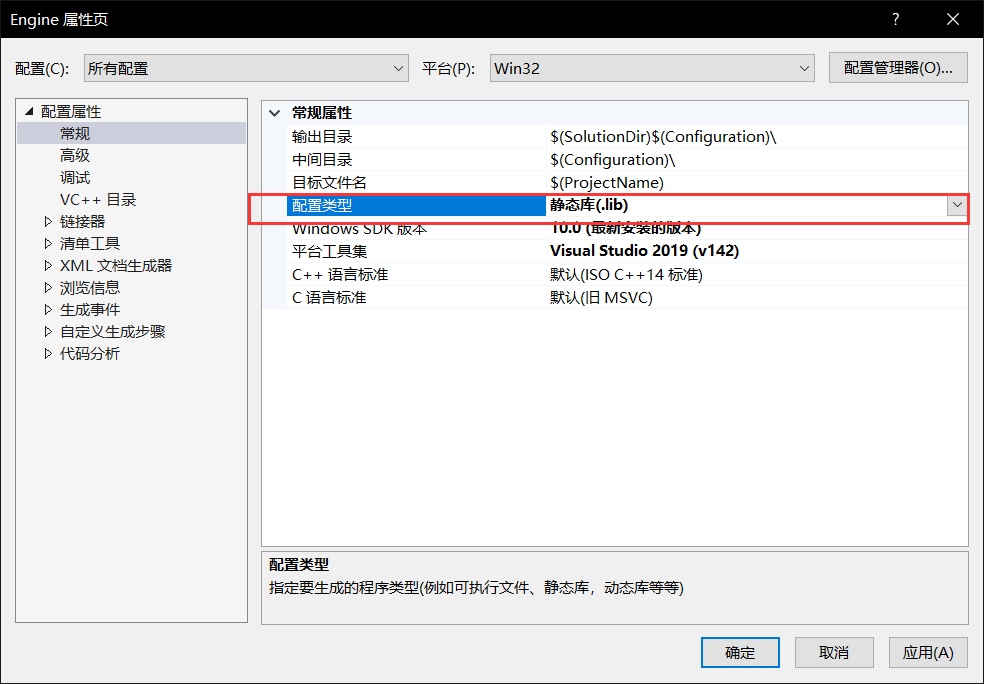
Making and Working with Libraries in C++生成库文件 首先把我们要输出的库文件配置类型改为静态类
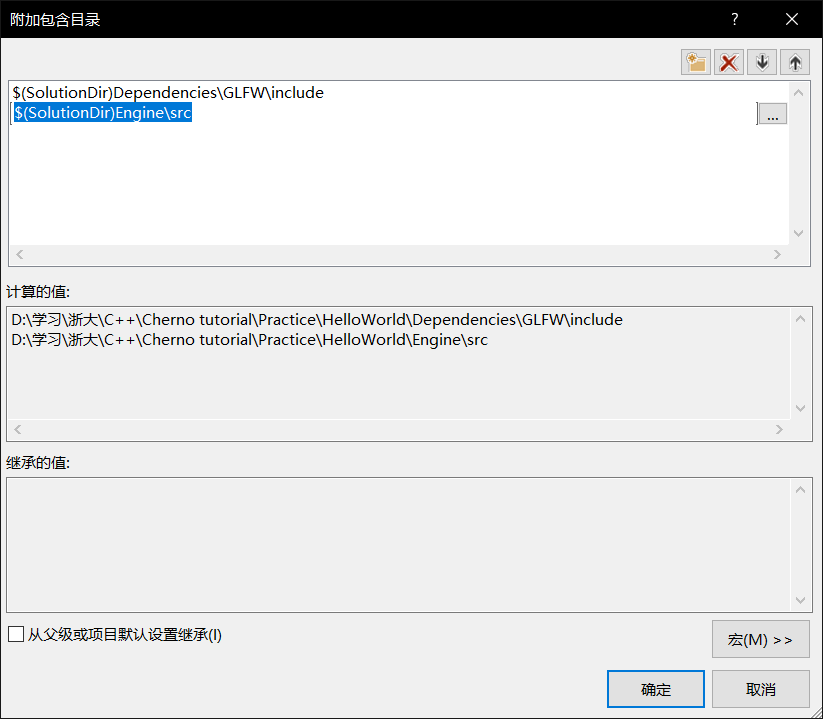
在所需要的项目里,include目录加上engine.h所在目录
这样engine已经可以在另一个项目中编译了,但还无法进行link
但是其实在生成engine项目时我们可以看到,它生成了一个lib文件
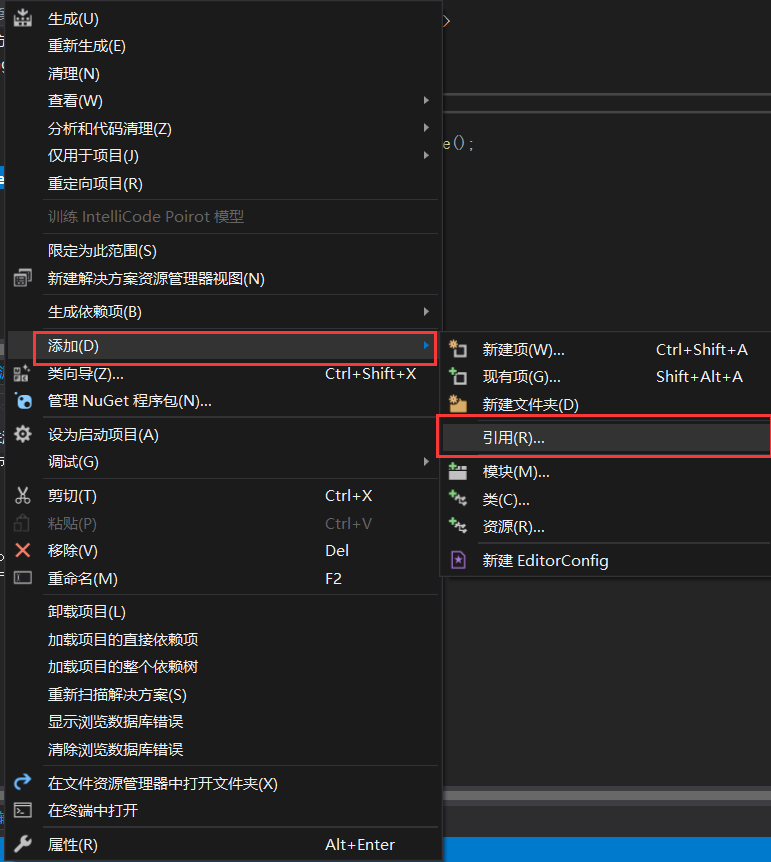
可以在helloWorld项目右键
引用选择Engine
然后生成时我们可以发现它首先生成Engine.lib,然后再生成Helloworld
使用静态链接生成的exe包含了所有的二进制文件,可以独立运行
How to Deal with Multiple Return Values处理多个返回值 对于同种变量,你可以返回一个数组std::<array,2> 或者用std::<vector>
不同种变量还可以使用tuple/pari
std::tuple<std::string,std::string>
定义的方式是std::make_pari<std::string,std::string>()
调用:std::get<0>(sources),std::get<1>(sources)
这需要使用
#include
#include
但是总之建议
使用指针/引用来处理返回值
或者使用数据结构