16 Writing a Basic Renderer 目前为止,如果我们每次想要绘制东西,都需要完成所有步骤-绑定-drawcall
希望能够提供
Renderer
unbind不是绝对的,但在debug中很有用,也许也能减少一些错误。但是实际上没有必要要,因为绑定下一个对象,就等于解绑了。
Renderer 要注意Renderer.h这里有一些小坑,就是作者include了VertexArray.h,其中又include了VertexBufferLayout。但是之前为了方便把debug的函数写在了Renderer当中,导致这里出现了相互include。解决方法就是把VertexArray.h中对VertexBufferLayout的include去掉,改成对这个class的声明,然后因为VertexArray.h还是需要使用其内部方法,在VertexArray.cpp 中再include VertexBufferLayout。
1 2 3 4 5 6 7 8 9 10 11 12 13 14 15 16 17 18 19 20 21 22 23 24 25 26 27 28 29 30 31 32 33 34 35 36 37 38 39 40 41 42 43 44 45 46 47 48 49 50 51 52 53 54 55 56 57 #pragma once #include <GL/glew.h> #include "VertexArray.h" #include "IndexBuffer.h" #include "Shader.h" #define ASSERT(x) if (!(x)) __debugbreak(); #define GLCall(x) GLClearError();\ x;\ ASSERT(GLLogCall(#x, __FILE__, __LINE__)) void GLClearError () bool GLLogCall (const char * function, const char * file, int line) class Renderer { private :public : void Clear () const void Draw (const VertexArray& va, const IndexBuffer& ib, const Shader& shader) const }; #include "Renderer.h" #include <iostream> void GLClearError () while (glGetError () != GL_NO_ERROR); } bool GLLogCall (const char * function, const char * file, int line) while (GLenum error = glGetError ()) { std::cout << "[OpenGL Error] (" << error << "): " << function << " " << file << " : " << line << std::endl; return false ; } return true ; } void Renderer::Clear () const glClear (GL_COLOR_BUFFER_BIT); } void Renderer::Draw (const VertexArray& va, const IndexBuffer& ib, const Shader& shader) const shader.Bind (); va.Bind (); ib.Bind (); GLCall (glDrawElements (GL_TRIANGLES, ib.GetCount (), GL_UNSIGNED_INT, nullptr )); }
drawcall
1
2
3
4
5
6
7
8
9
10
11
12
13
14
15
16
17
18
while (!glfwWindowShouldClose (window)){ renderer.Clear (); shader.Bind (); shader.SetUniform4f ("u_Color" , r, 0.3f , 0.8f , 1.0f ); renderer.Draw (va, ib, shader); if (r > 1.0f ) increment = -0.05f ; else if (r < 0.0f ) increment = 0.05f ; r += increment; glfwSwapBuffers (window); glfwPollEvents (); }
这样我们在renderer当中有顶点数组和索引缓冲区以及一个shader。
但是相比于shader,在传统的渲染器中采用的是材质material。材质就是shader加上一组数据(uniforms)。
这样将material传递给renderer,它将直接把shader和uniform绑定,然后再进行drawcall。。。
在本教程中也许不会涉及,但是在Game Engine中一定需要做。
17 Textures 我们会忽略游戏中使用的纹理格式,但反正肯定不是png
将图片加载到cpu memory
将pixel array 传递到GPU
使用shader读取到texture
我们这里将会使用#include <stb_image.h>来处理png图片
stb/stb_image.h at master · nothings/stb (github.com)
(直接拿图形学课的框架里的用了),我们实际上只需要使用stb_image.h
在项目中新建stb_image.h和stb_image.cpp文件,把头文件直接复制进去,并且根据注释说明,在cpp文件中添加
1 2 #define STB_IMAGE_IMPLEMENTATION #include "stb_image.h"
这样就可以使用了。
然后我们要添加texture类
1 2 3 4 5 6 7 8 9 10 11 12 13 14 15 16 17 18 19 20 21 22 23 24 25 26 #pragma once #include "Renderer.h" class Texture { private : unsigned int m_RendererID; std::string m_FilePath; unsigned char * m_LocalBuffer; int m_Width, m_Height, m_BPP; public : Texture (const std::string& path); ~Texture (); void Bind (unsigned int slot = 0 ) const void Unbind () const inline int GetWidth () const return m_Width; } inline int GetHeight () const return m_Height; } };
Texture.cpp
1 2 3 4 5 6 7 8 9 10 11 12 13 14 15 16 17 18 19 20 21 22 23 24 25 26 27 28 29 30 31 32 33 34 35 36 37 38 39 40 41 42 43 44 45 46 47 #include "Texture.h" #include "vendor/stb_image/stb_image.h" Texture::Texture (const std::string& path) : m_RendererID (0 ), m_FilePath (path), m_LocalBuffer (nullptr ), m_Width (0 ), m_Height (0 ), m_BPP (0 ) { stbi_set_flip_vertically_on_load (1 ); m_LocalBuffer = stbi_load (path.c_str (), &m_Width, &m_Height, &m_BPP, 4 ); GLCall (glGenTextures (1 , &m_RendererID)); GLCall (glBindTexture (GL_TEXTURE_2D, m_RendererID)); GLCall (glTexParameteri (GL_TEXTURE_2D, GL_TEXTURE_MIN_FILTER, GL_LINEAR)); GLCall (glTexParameteri (GL_TEXTURE_2D, GL_TEXTURE_MAG_FILTER, GL_LINEAR)); GLCall (glTexParameteri (GL_TEXTURE_2D, GL_TEXTURE_WRAP_S, GL_CLAMP_TO_EDGE)); GLCall (glTexParameteri (GL_TEXTURE_2D, GL_TEXTURE_WRAP_T, GL_CLAMP_TO_EDGE)); GLCall (glTexImage2D (GL_TEXTURE_2D, 0 , GL_RGBA8, m_Width, m_Height, 0 , GL_RGBA, GL_UNSIGNED_BYTE, m_LocalBuffer)); GLCall (glBindTexture (GL_TEXTURE_2D, 0 )); if (m_LocalBuffer) stbi_image_free (m_LocalBuffer); } Texture::~Texture () { glDeleteTextures (1 , &m_RendererID); } void Texture::Bind (unsigned int slot) const glActiveTexture ( GL_TEXTURE0 + slot); glBindTexture (GL_TEXTURE_2D, m_RendererID); } void Texture::Unbind () const glBindTexture (GL_TEXTURE_2D, 0 ); }
这中间还有一些需要修改的,比如uniform、shader中的varying变量(in、out)
1
2
3
4
void Shader::SetUniform1i (const std::string& name, int value) glUniform1i (GetUniformLocation (name), value); }
当画出来的屏幕是黑的时候,加上GLCall()来debug就显得非常好用了
直接提示到我们
是这句发生了错误
1
2
3
glTexImage2D (GL_TEXTURE_2D, 0 , GL_RGBA8, m_Width, m_Height, 0 , GL_RGBA8, GL_UNSIGNED_BYTE, m_LocalBuffer); glTexImage2D (GL_TEXTURE_2D, 0 , GL_RGBA8, m_Width, m_Height, 0 , GL_RGBA, GL_UNSIGNED_BYTE, m_LocalBuffer);
根据文档,这里两个format分别是internal format和format。internal format是opengl储存纹理的方法。format是提供的纹理的格式。所以我们提供GL_RGBA8告诉opengl储存单通道8位。而我们提供的纹理则是GL_RGBA格式的。
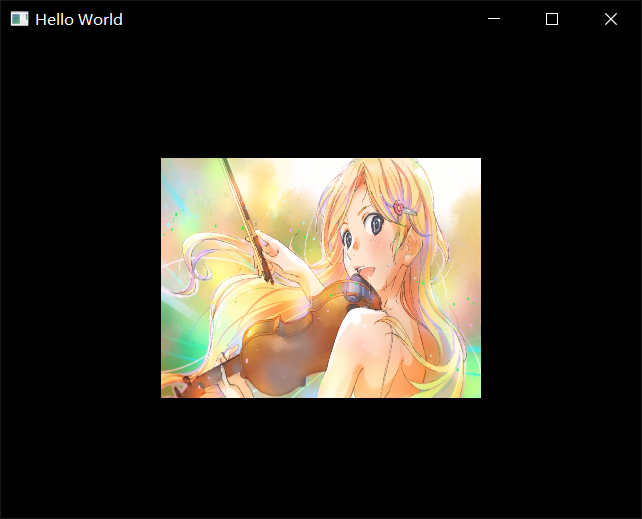
这样就非常完美地画出了薰。
(作者由于透明度混合设置的问题,图片出现了失真。)
1
2
glBlendFunc (GL_SRC_ALPHA, GL_ONE_MINUS_SRC_ALPHA);glEnable (GL_BLEND);
18 Blending Blending determines how we combine our output color with what is already in our target buffer.
output
the color we output from our fragment shader
Target buffer
the buffer our fs is drawing to (destination)
如何控制Blending
glEnable(GL_BLEND)-glDisable(GL_BLEND)
glBlendFunc(src, dest)
src = how the src RGBA factor is computed(default is GL_ONE)
dest = how the dest RGBA factor is computed(default is GL_ZERO)
glBlendEquation(mode)(BlendOp)
mode = how we combine the src and dest colors
Defualt value is GL_FUNC_ADD
19 Maths ignored
在该教程中会使用glm(适用于opengl的数学库)。并且适配与opengl列主序的矩阵。
通常在我们自己写跨平台的引擎时,也会自己写数学库。可以是行主序的。
Releases · g-truc/glm (github.com)
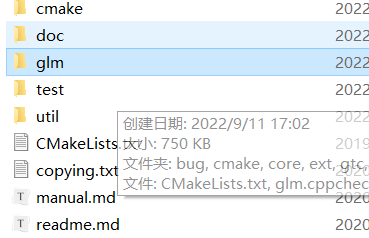
我们可以在glm的git上下到release版,这里还是就直接把之前的复制到Dependencies里了。
实际上我们只需要glm文件夹里的东西。
作者把它也放进了vendor文件夹里。
(其实我也更倾向放到Dependencie里作为附加包含目录)
GLM也是一个只包含头文件的库,没有cpp文件,不需要编译
事实上,作者随后就把vendor文件夹放到了附加包含目录里。。。
20 Projection Matrices 在projection中我们完成了归一化齐次坐标[-1,1]^3
略了
21 Model View Projection Matrices 1 2 3 4 5 glm::mat4 proj = glm::ortho (-2.0f , 2.0f , -1.5f , 1.5f , -1.0f , 1.0f ); glm::mat4 view = glm::translate (glm::mat4 (1.0f ), glm::vec3 (-1 , 0 , 0 )); glm::mat4 model = glm::translate (glm::mat4 (1.0f ), glm::vec3 (2 , 2 , 0 )); glm::mat4 mvp = proj * view * model;
在这里对view的处理很简单,就是我们向右移动相机,等同于向左移动物体。
22 ImGui 环境配置 这里只是简单地将imgui移植到我们的opengl中,
ocornut/imgui: Dear ImGui: Bloat-free Graphical User interface for C++ with minimal dependencies (github.com)
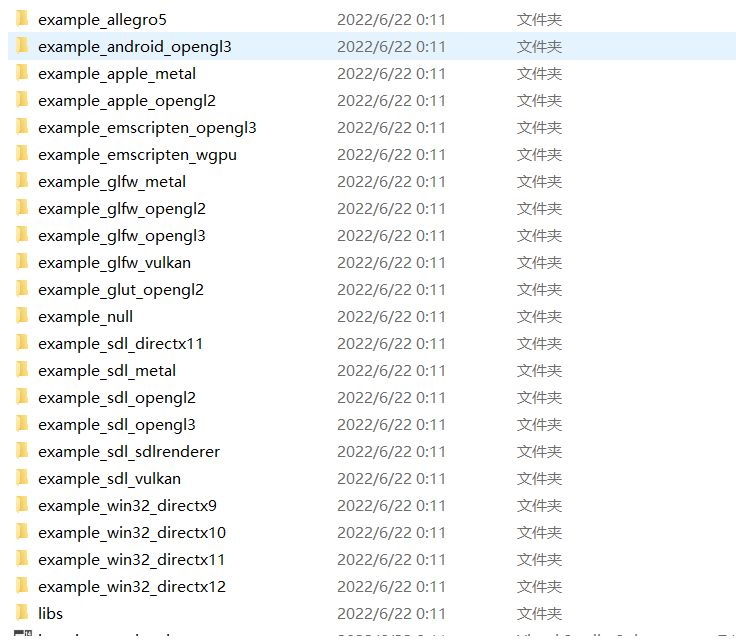
下载到release的source code
它提供了我们一个vs工程文件和一大堆各种平台的项目,我们也可以在这里面找到关于glfw_opengl3的example
而我们实际需要的是根目录下的那些头文件和cpp文件。总之我们把他们复制到vendor中的imgui文件夹,就可以用了。
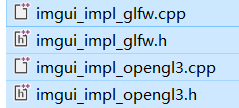
我对比了一下这里的以及图形学课用的框架里的,多了这四个文件
可以看到这是imgui对glfw和opengl的实现(implementation)。在作者下载的imgui版本中,它们存在于examples当中(opengl3_example),但是我这里下载的版本已经更新了。
找了一下,它们已经更换了目录结构,现在这些impl文件都在backends文件夹中
所以我们还是得把这四个文件复制过去。
作者的版本当中的imgl_glfw使用了gl3w,有提示需要改成glew,但在我们这里没有这个问题。
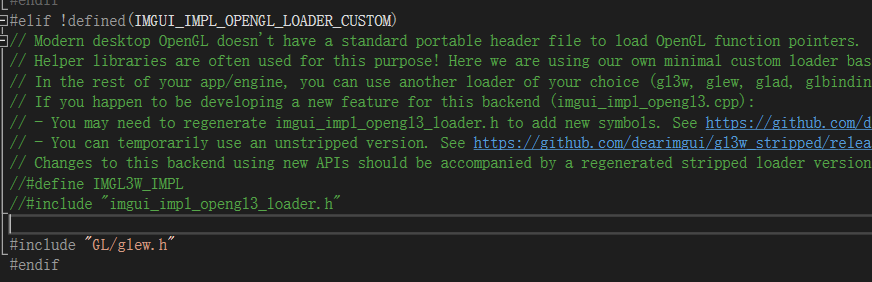
但我们编译时会发现它新增了一个
1 2 3 4 5 6 7 8 9 10 #define IMGL3W_IMPL #include "imgui_impl_opengl3_loader.h"
意思就是。。。他们还是自己搞了一个gl3w,并且封装在这个loader头文件中了。。。我们直接删掉这是两行换成glew,看看理解对不对
如下
然而不对,这里后面会用到gl3w的api
OpenGL 后端现在嵌入了自己的 GL 加载程序 (imgui_impl_opengl3_loader.h) ·问题 #4445 ·ocornut/imgui (github.com)
后来感觉这样还是不行,loader里面就是对gl3w的实现了,我们应该直接换glew。因此注释掉上面两行以后,定位到接下来的问题
对于这里的初始化,我们直接给换成glewInit。这样就顺利运行了。
还是踩了些小坑,麻烦的话就直接跟着教程版本一致就好了。
使用imgui 我们还是可以参考example中main里面的实现。
1 2 3 4 5 6 7 8 9 10 11 12 13 14 IMGUI_CHECKVERSION ();ImGui::CreateContext (); ImGuiIO& io = ImGui::GetIO (); (void )io; ImGui::StyleColorsDark (); ImGui_ImplGlfw_InitForOpenGL (window, true );ImGui_ImplOpenGL3_Init (glsl_version);
和教程里面稍有变化(瑟瑟发抖,感觉坑会越来越多了,有点后悔),幸好和图形学课里的框架还是比较接近的,还算能参考一下。
助教的框架向上再封装了一层。这个教程这里大概是为了简单,直接写在了main函数里。
直接把上面的初始化复制上去,然后回头添加头文件
1 2 3 #include <imgui/imgui.h> #include <imgui/imgui_impl_glfw.h> #include <imgui/imgui_impl_opengl3.h>
还有个glsl_version变量,在example里面是定义的。但是我们去这个函数里看一看,其实如果直接给NULL的话,是有默认值的。
1 2 3 4 5 6 7 8 9 10 11 12 if (glsl_version == NULL ) { #if defined(IMGUI_IMPL_OPENGL_ES2) glsl_version = "#version 100" ; #elif defined(IMGUI_IMPL_OPENGL_ES3) glsl_version = "#version 300 es" ; #elif defined(__APPLE__) glsl_version = "#version 150" ; #else glsl_version = "#version 130" ;
并且注释很贴心地告诉我们,如果不确定glsl的版本,就直接留空
所以这个glsl_version变量我们直接删掉。
虽然和教程里面不一样,会多一些步骤,但像这样自己解决掉问题还是会很有成就感的吧,其实也不难对吧。
(实际上作者也跳过了里面io的初始化,这个我们也可以删掉)
然后是循环中的newframe步骤(作者仅需一行,我们这里变成了三行)
1 2 3 4 ImGui_ImplOpenGL3_NewFrame ();ImGui_ImplGlfw_NewFrame ();ImGui::NewFrame ();
关于位置,助教框架的做法是——先渲染画面,再渲染gui。这一部分放在一个renderframe函数中,向上封装的流程是——输入输出处理-renderframe-swapbuffer-pollEvent
这也很符合逻辑,我们就也把这部分放在交换缓冲之前好了。(其实作者提出放哪里都行,只要Imgui的代码是放在这里面end之前就好了)
然后我们添加render命令
1 2 3 ImGui::Render (); ImGui_ImplOpenGL3_RenderDrawData (ImGui::GetDrawData ());
在循环结束后,我们还要shutdown
1 2 3 ImGui_ImplOpenGL3_Shutdown ();ImGui_ImplGlfw_Shutdown ();ImGui::DestroyContext ();
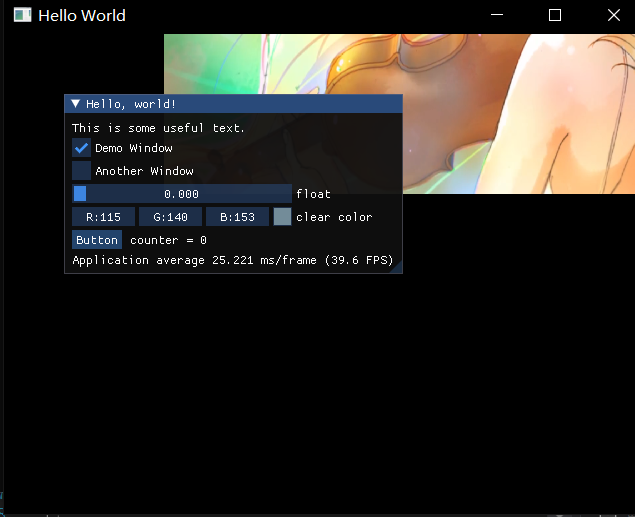
然后关于gui里的具体内容我们就复制一下example的就好了
1 2 3 4 5 6 7 8 9 10 11 12 13 14 15 16 17 18 19 20 21 { static float f = 0.0f ; static int counter = 0 ; ImGui::Begin ("Hello, world!" ); ImGui::Text ("This is some useful text." ); ImGui::Checkbox ("Demo Window" , &show_demo_window); ImGui::Checkbox ("Another Window" , &show_another_window); ImGui::SliderFloat ("float" , &f, 0.0f , 1.0f ); ImGui::ColorEdit3 ("clear color" , (float *)&clear_color); if (ImGui::Button ("Button" )) counter++; ImGui::SameLine (); ImGui::Text ("counter = %d" , counter); ImGui::Text ("Application average %.3f ms/frame (%.1f FPS)" , 1000.0f / ImGui::GetIO ().Framerate, ImGui::GetIO ().Framerate); ImGui::End (); }
(还有三个小变量,直接复制一下就好了)
非常好用。
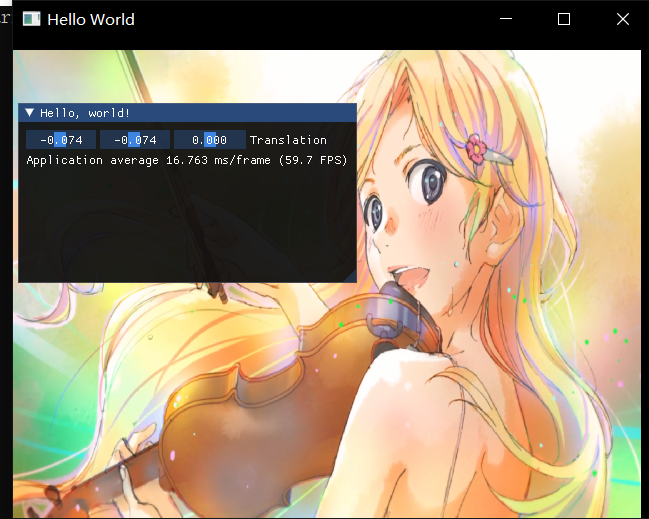
然后我们要开始改造自己需要的gui了。
1 2 3 4 5 6 7 8 9 10 11 glm::mat4 model = glm::translate (glm::mat4 (1.0f ), translation); glm::mat4 mvp = proj * view * model; { ImGui::Begin ("Hello, world!" ); ImGui::SliderFloat3 ("Translation" , &translation.x, -2.0f , 2.0f ); ImGui::Text ("Application average %.3f ms/frame (%.1f FPS)" , 1000.0f / ImGui::GetIO ().Framerate, ImGui::GetIO ().Framerate); ImGui::End (); }
我们把model的修改移动到主循环当中,也非常好用。
这里我们使用的Float3,只提供了第一个translation.x 的指针。在使用的时候我们也要注意,glm::vec3这种结构储存的数据在内存上是不是连续的。
23 Rendering Multiple Objects 回顾我们之前的drawcall的部分,主要是这几个步骤
1 2 3 4 shader.Bind (); va.Bind (); ib.Bind (); GLCall (glDrawElements (GL_TRIANGLES, ib.GetCount (), GL_UNSIGNED_INT, nullptr ));
分析shader当中,我们想要画出另一个位置的物体,我们可以提供一个不同的vertex buffer
那么当然也可以使用另一个mvp(这当然也更快)。
当我们要绘制同一个物体很多次时(如tile类型的这种东西)我们没有必要用for loop像这样去绘制很多次,而是可以用==batching== 合批的方法,只调用一次drawcall,把所有的东西放到一个vertex buffer里。