作业0 作业0就配置下环境,但是会遇到模型有时候加载不出来的问题,论坛里说得很清楚。
https://games-cn.org/forums/topic/zuoye0-jieguobuwendingyoushimoxingxianshibuquan/
由于异步处理,如果这张材质图片是后加载的就看不见了,因此解决操作是把它预先加载。
其次是在框架上编写Phong模型的shader,跟着说明做就行了。
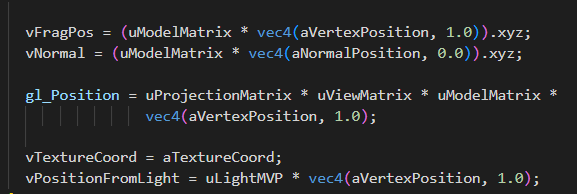
作业1 CalcLightMVP 第一步需要完成shadow mapping的部分,计算方向光下的MVP矩阵。
1
2
3
4
5
6
7
8
9
10
11
12
13
14
15
16
17
CalcLightMVP (translate, scale) { let lightMVP = mat4.create (); let modelMatrix = mat4.create (); let viewMatrix = mat4.create (); let projectionMatrix = mat4.create (); mat4.multiply (lightMVP, projectionMatrix, viewMatrix); mat4.multiply (lightMVP, lightMVP, modelMatrix); return lightMVP; }
这里提供了translate和scale的参数,没有rotation,那就不用。
并且我们在Mesh Render当中可以找到camera计算MVP的部分
Model的部分可以直接照抄了,这里也是没有Rotation的,可见估计是为了方便,省去了四元数等等的旋转计算,就没有做旋转变换。
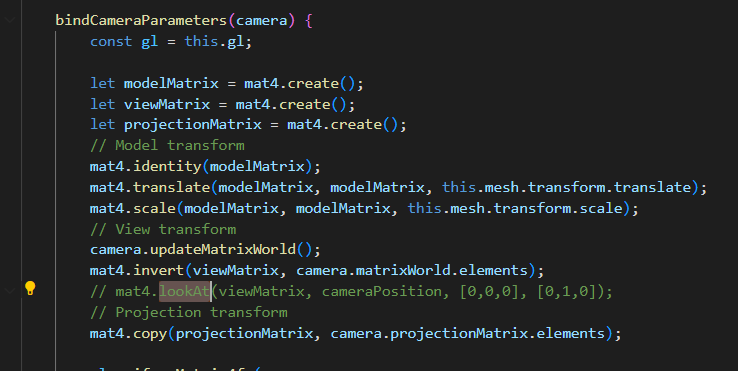
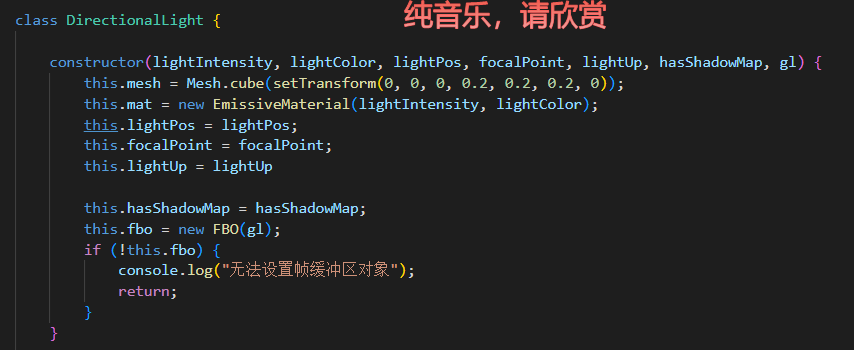
接下来是View矩阵的部分。在方向光的构造函数中,提供了一些东西,有lightPos和focalPoint,我们就可以计算出front,有up,那么view矩阵就很好算出来了。
但是我一直没有找到这个框架矩阵运算的api,只能看里面已经有的怎么用我就怎么用……上面有个lookAt的方法,那就用它了。
猜也很好猜(输出,相机位置,focal位置,up向量)
还是给找到了,矩阵运算的api用了一个gl-matrix-min的库,这个东西就来自于gl-matrix,百度搜到文档
https://glmatrix.net/docs/module-mat4.html
最后变成就这么几行
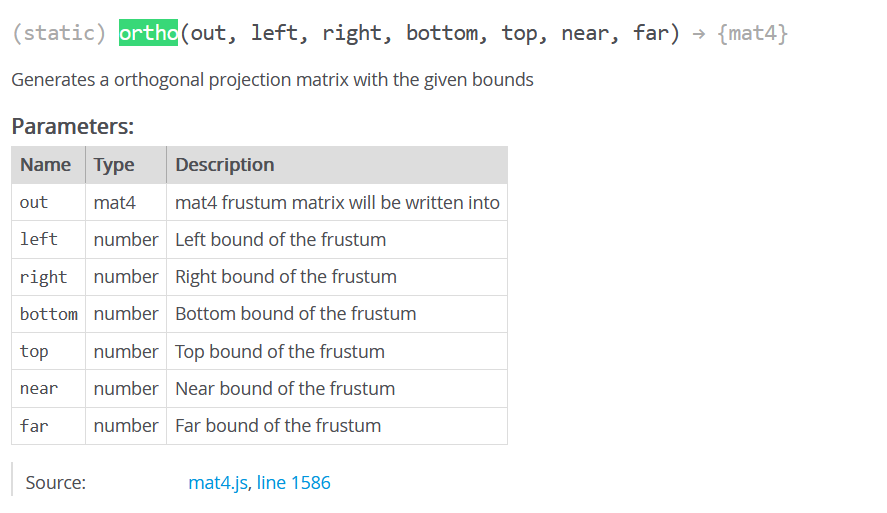
1
2
3
4
5
6
7
8
9
10
11
12
13
14
15
16
17
18
19
20
21
22
CalcLightMVP (translate, scale) { let lightMVP = mat4.create (); let modelMatrix = mat4.create (); let viewMatrix = mat4.create (); let projectionMatrix = mat4.create (); mat4.translate (modelMatrix, modelMatrix, translate); mat4.scale (modelMatrix, modelMatrix, scale); mat4.lookAt (viewMatrix, this .lightPos , this .focalPoint , this .lightUp ); mat4.ortho (projectionMatrix,-150 , 150 , -80 , 80 , 0 , 400 ); mat4.multiply (lightMVP, projectionMatrix, viewMatrix); mat4.multiply (lightMVP, lightMVP, modelMatrix); return lightMVP; }
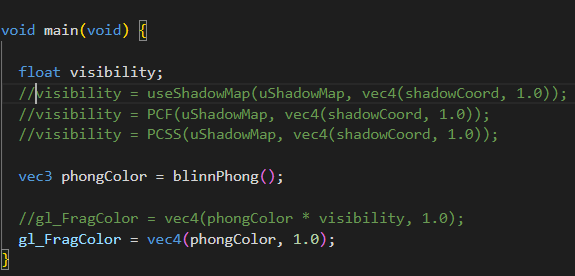
useShadowMap 下一步就是完成fs中的可见性计算,框架给我们准备得很好,可以看到包括后面进阶部分的PCF和PCSS,都封装好了,只需要填函数就可以了。
首先需要完成的是useShadowMap来做一个简单的shadow map
首先我们要用shadow Coord去采样shadow Map来获得着色点在灯光视角下的该位置的最小深度。因此采样我们应该在灯光的齐次裁剪空间坐标下。
顶点着色器已经把它做好了,就是vPositionFromLight。
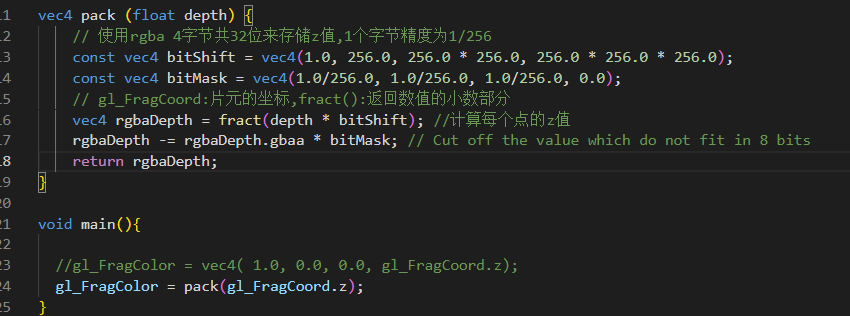
我们也可以在shadowFragment当中看到在light pass中对深度的处理
将片元的深度进行了pack。注意这里的深度,是在片元着色器阶段,因此,齐次裁剪空间的坐标需要经过透视除法。(虽然正交投影没有影响)
还要注意,采样贴图需要在0-1完成,这使得我们需要做一个映射操作
1 vec3 shadowCoord = (vPositionFromLight.xyz/vPositionFromLight.w) * 0.5+vec3(0.5);
但是问题来了,在learnopengl中,因为深度贴图储存范围在0-1,所以深度也需要做这个映射,我们这里把深度用pack的方法保存存了,为什么还要做这个映射呢?不是只需要映射xy就行了吗?
问题的根节是,framebuffer中存储的深度到底是什么深度?pack暂且不管,也就是说,gl_FragCoord.z到底是什么?首先像上面说的,肯定是在NDC空间的z经过了透视除法之后,但这一部分也是在[-1,1]^3中,(由于平台差异,如D3D的NDC空间的z就是[0,1])那么为了写入深度缓冲,Opengl自己做了这一部分的映射
https://zhuanlan.zhihu.com/p/66175070
这一点只要记住就行了,总得来说,gl_FragCoord.z就是深度缓冲中的值,也就是[-1,1]=>[0,1]变换过后的NDC的z值。总之,这里虽然整体*0.5+0.5,做了变换,但意义是不同的。
那么最后在shadow map的部分,提取出深度拿来比较一下就好了。
1
2
3
4
5
6
float useShadowMap (sampler2D shadowMap, vec4 shadowCoord ){ float depth = unpack (texture2D (shadowMap, shadowCoord.xy )); float currentDepth = shadowCoord.z ; float bias = 0.005 ; return depth<currentDepth - bias ? 0.0 : 1.0 ; }
这一部分算是完成了。
PCF 这一部分也很容易,跟着learnopengl也能做,不过作业框架中提出,我们可以对比一下两种采样的区别
1
2
3
4
5
6
7
8
9
10
11
12
13
14
15
16
17
18
19
20
21
22
23
void uniformDiskSamples ( const in vec2 randomSeed ) { float randNum = rand_2to1 (randomSeed); float sampleX = rand_1to1 ( randNum ) ; float sampleY = rand_1to1 ( sampleX ) ; float angle = sampleX * PI2 ; float radius = sqrt (sampleY); for ( int i = 0 ; i < NUM_SAMPLES ; i ++ ) { poissonDisk[i] = vec2 ( radius * cos (angle) , radius * sin (angle) ); sampleX = rand_1to1 ( sampleY ) ; sampleY = rand_1to1 ( sampleX ) ; angle = sampleX * PI2 ; radius = sqrt (sampleY); } } float findBlocker ( sampler2D shadowMap, vec2 uv, float zReceiver ) { return 1.0 ; }
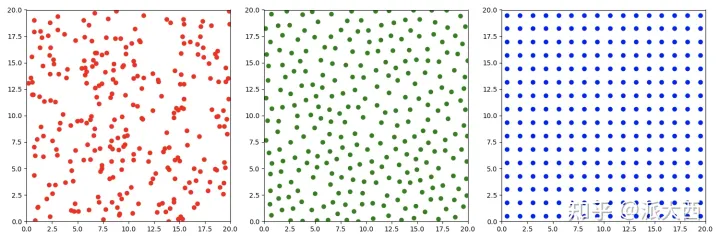
这里做的是单位圆盘上的随机采样,把一个vec2储存到了poisonDisk的数组上。那么我们只需要在采样shadowmap的纹理坐标上,增加一个这个位置的样本即可。要注意的是我们的纹理采样是在0-1范围上的,因此这个位置也应该根据纹素大小进行放缩(如果把纹素大小看作单位长度的话)。这一部分learnopengl直接用了textureSize的API,但我们使用的opengl ES版本似乎不支持这个api,但是能够在engine.js中找到对framebuffer的定义
因此只需要除以2048即可。我们也可以通过对这个采样范围进行任意的放缩,相当于不同size的kernel。(比较喜欢这个框架的采样的处理方式,learnopengl中的遍历纹素就太笨重了)。
1
2
3
4
5
6
7
8
9
10
11
12
13
14
float PCF (sampler2D shadowMap, vec4 coords ) { poissonDiskSamples (coords.xy ); float currentDepth = coords.z ; float bias = 0.005 ; float shadow = 0.0 ; float texelSize = 1.0 / 2048.0 ; for (int i =0 ; i <NUM_SAMPLES ;i++) { float depth = unpack (texture2D (shadowMap, coords.xy + poissonDisk[i] * texelSize * 10.0 )); shadow += depth<currentDepth - bias ? 0.0 : 1.0 ; } shadow = shadow/float (NUM_SAMPLES ); return shadow; }
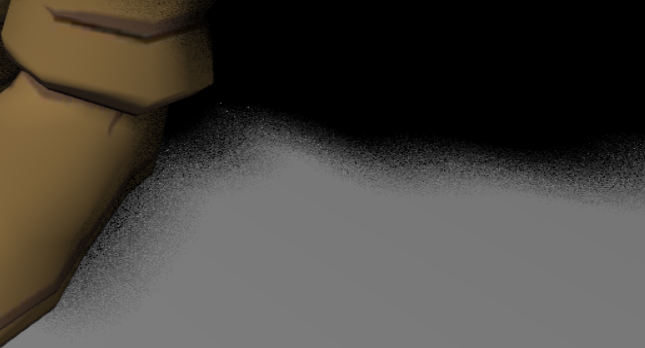
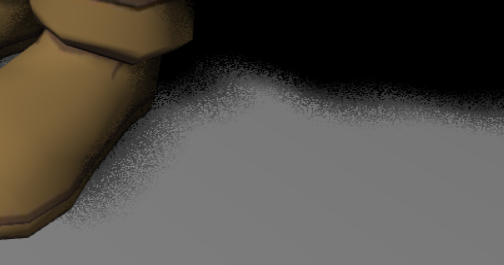
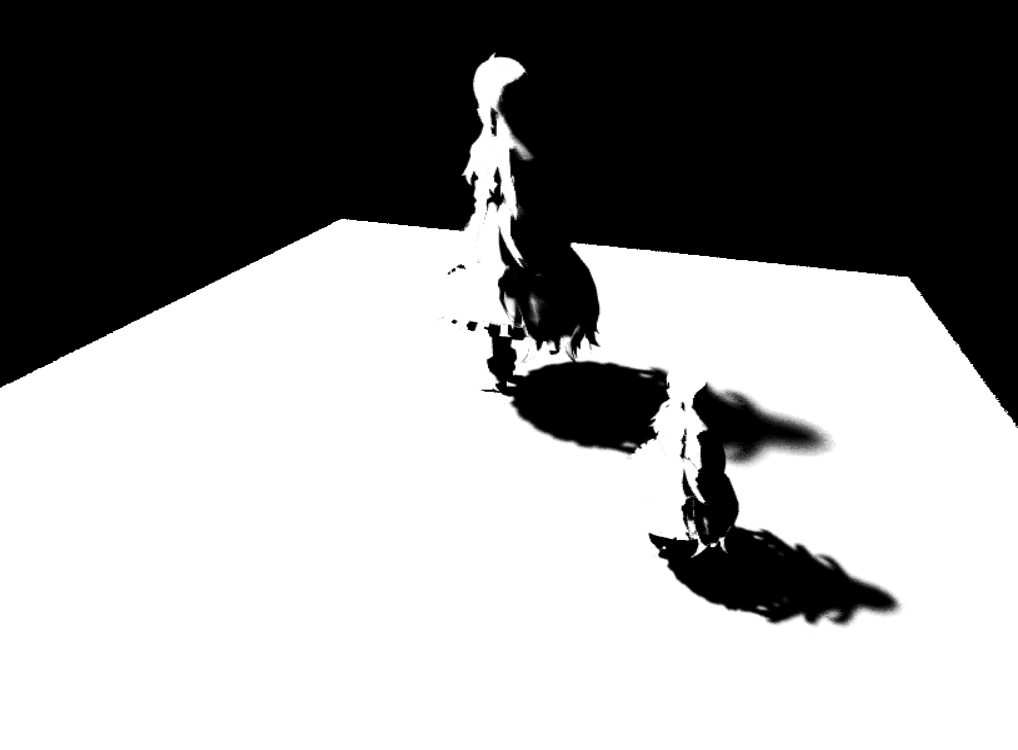
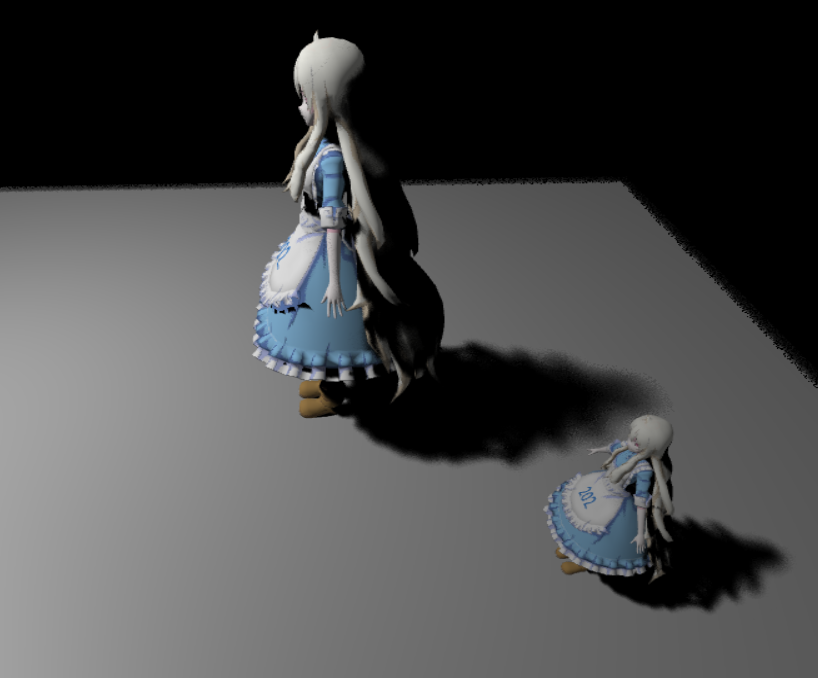
效果如下
边缘是被模糊了,但是如果我们想要更多的模糊,会发现模型其他部分也受到了影响,出现一些噪声。
Uniform:
Poisson:
关于泊松圆盘采样,这里说得很好,一张图就可以解释
https://zhuanlan.zhihu.com/p/484414050
PCSS 1 2 3 4 5 6 7 8 9 10 11 12 13 14 15 16 17 18 19 20 21 22 23 24 25 26 27 28 29 30 31 32 33 34 35 36 37 38 39 40 41 42 43 44 45 46 47 48 float findBlocker ( sampler2D shadowMap, vec2 uv, float zReceiver ) poissonDiskSamples (uv); float texelSize = 1.0 / 2048.0 ; float blockDepth = 0.0 ; float radius =40.0 ; float bias = 0.005 ; int blockNum = 0 ; for (int i=0 ; i < BLOCKER_SEARCH_NUM_SAMPLES; i++) { float depth = unpack (texture2D (shadowMap, uv + poissonDisk[i] * texelSize * radius)); if (depth < zReceiver - bias) { blockDepth += depth; blockNum += 1 ; } } if (blockNum == 0 ) { return 1.0 ; } blockDepth /= float (blockNum); return blockDepth; } float PCSS (sampler2D shadowMap, vec4 coords) poissonDiskSamples (coords.xy); float receiverDepth = coords.z; float LightSize =40.0 ; float texelSize = 1.0 / 2048.0 ; float blockDepth = findBlocker (shadowMap, coords.xy, receiverDepth); float penumbraSize = (receiverDepth - blockDepth) / blockDepth* LightSize; float shadow = 0.0 ; float bias = 0.005 ; for (int i =0 ; i <PCF_NUM_SAMPLES;i++) { float depth = unpack (texture2D (shadowMap, coords.xy + poissonDisk[i] * texelSize * penumbraSize)); shadow += depth<receiverDepth - bias ? 0.0 : 1.0 ; } shadow = shadow/float (PCF_NUM_SAMPLES); return shadow; }
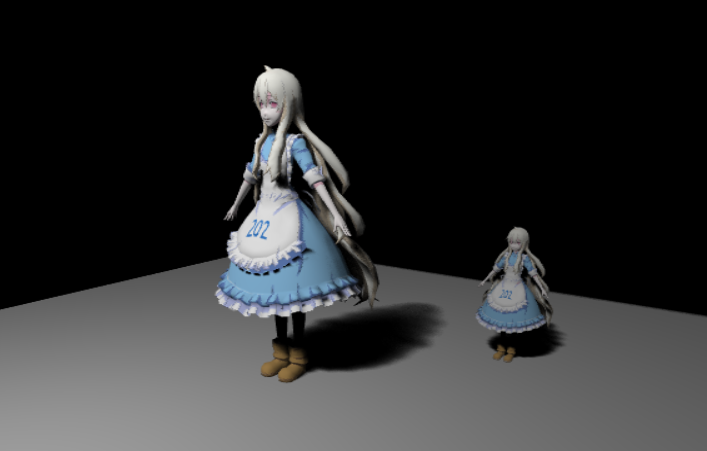
一些小小的filterSize的可视化
可以注意到这种边缘的地方实际上存在artifacts
解决方法如下
https://games-cn.org/forums/topic/zuoye1-dibanbianyuanjianbianhuisejiejuefangfa/
https://games-cn.org/forums/topic/zuoye1guanyuplanebianjiezaodiandecaiceyujiejue/
(但也不能完全解决)
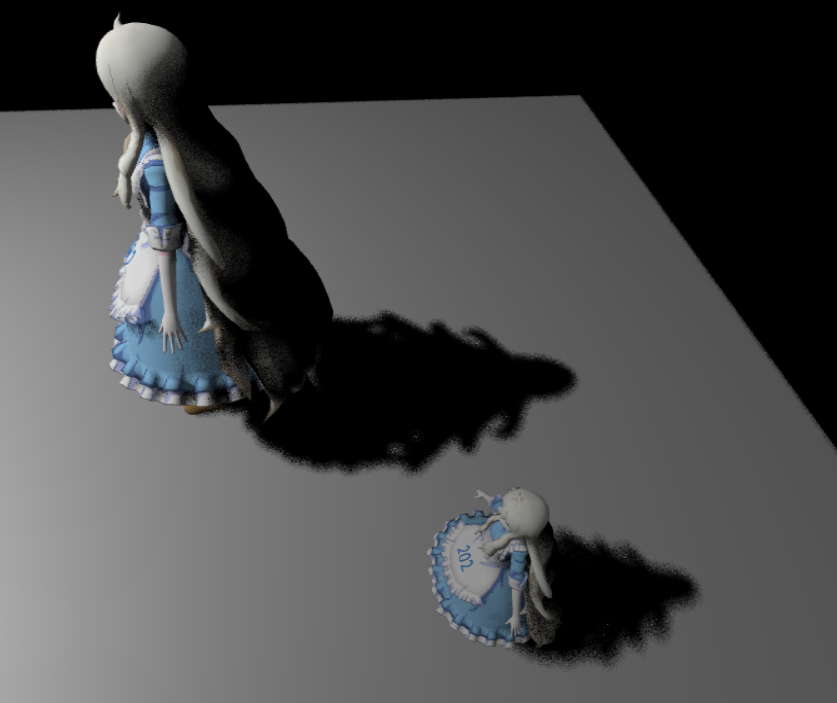
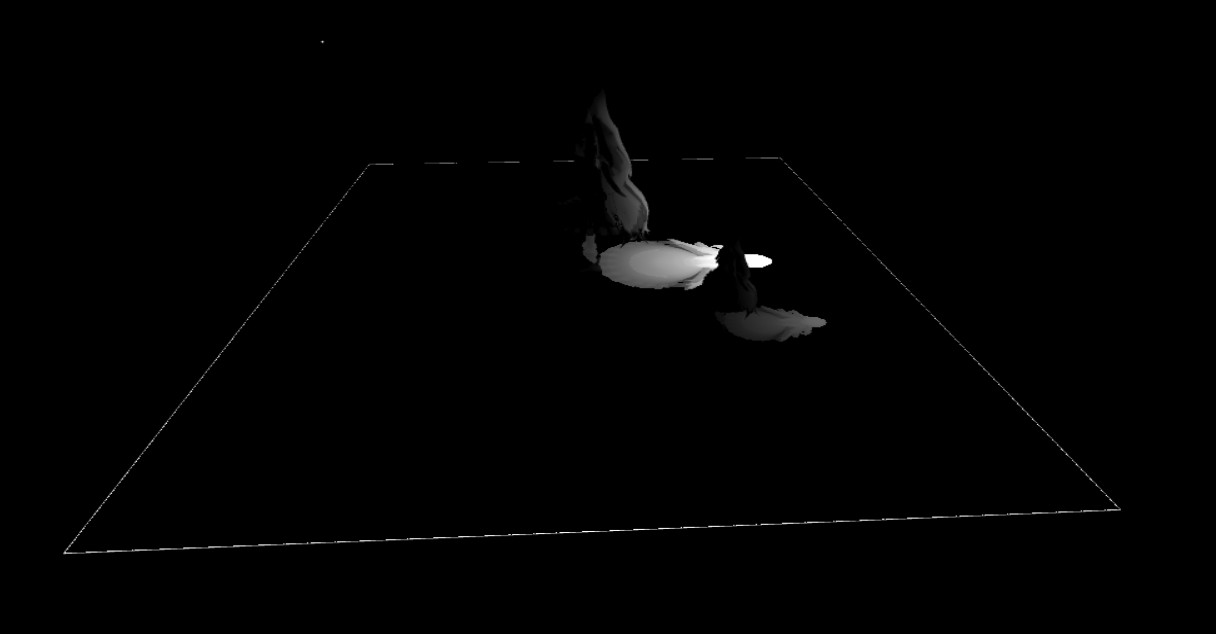
Shadow的可视化
增加一点高质量的
下一部分就直接进入PRT了,就不接在这儿了,不然太长了